Control Xeoma using JSON: the whats and hows
Sources Filters Destinations API tables

What do we know about automation? The main idea behind it is to make various programs and devices cooperate with each other to raise their overall effectiveness, especially without human interference. This is much like a well-trained choir where each member gets a tune of their own, and yet together they comprise a wholesome musical. Home automation is an example familiar to many by now, and those who haven’t dipped their toes into this topic yet are quite likely to do so eventually.
How exactly such automation works is a questions without a clearly defined answer – almost every such system is quite unique and needs to be studied individually. This is where things like APIs, common protocols and integration options become invaluable. Among the common protocols often used for web-based integration one will quickly find JSON – JavaScript Object Notation – a simple, yet robust, format that became XML’s more successful younger brother.
And now Xeoma has learned how to work with it too.

|
Licensing of JSON API in Xeoma. In order to use JSON API in Xeoma, you need to have Xeoma Pro license activated on your server at least for 1 camera. In this case you’ll be able to use JSON API (for all cameras). You can purchase Xeoma Pro license here. |
So, what exactly can you do with Xeoma using JSON? You can control the very bones of the system – its modules, all of them. This is best demonstrated with examples.
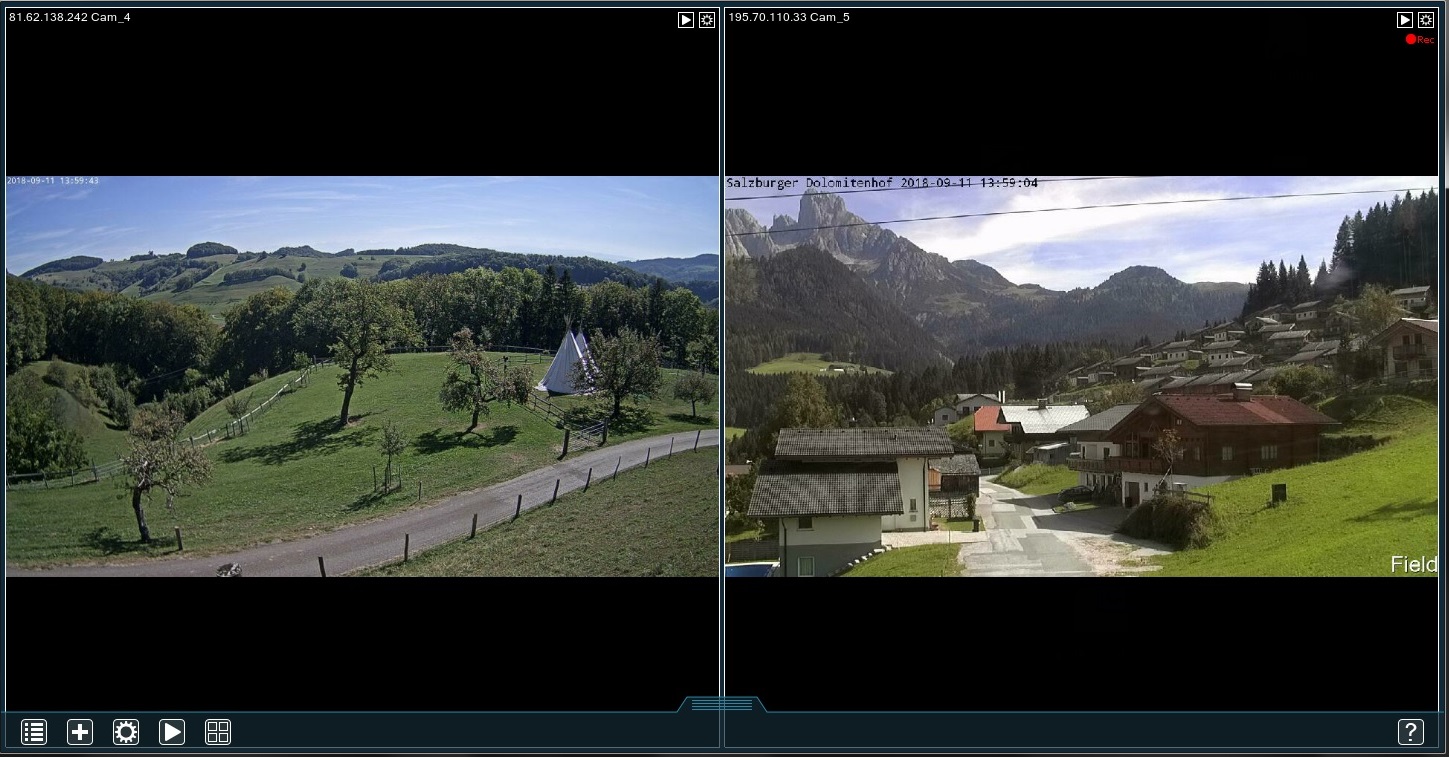
Suppose we have a couple of cameras added to our server:
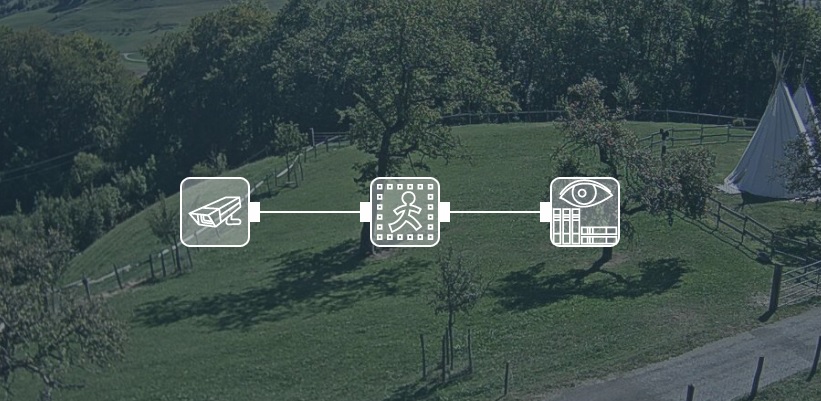
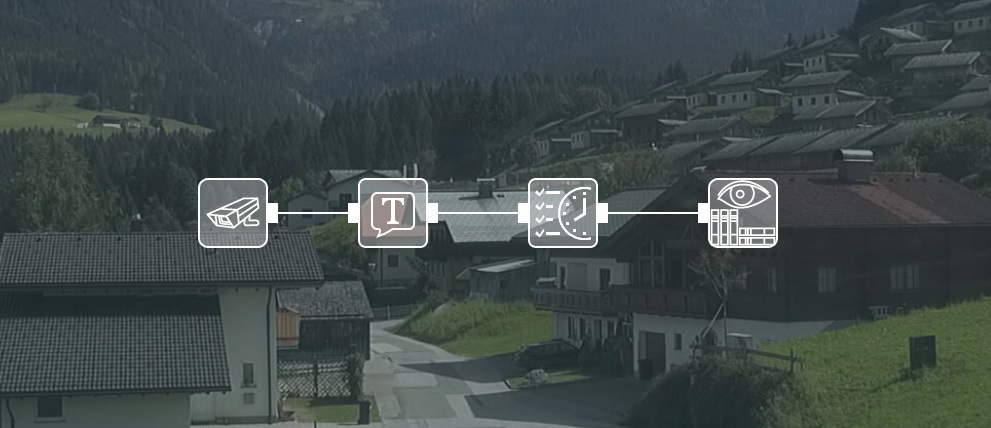
Their respective chains look like this:
The easiest way to look at how this API works is to use a Google Chrome extension called “Tabbed Postman – REST Client”. There are 2 main reasons for that:
- GET requests can be sent via a browser normally, but the response is going to look rather cluttered. The extension makes it more readable for a human eye.
- POST requests can’t be sent via a browser but can be sent via the OS’s own means (e.g. curl). The problem, however, is that this method requires rather in-depth knowledge of the command structures and proficiency with command-line interface. The extension is far more newbie-friendly.
To clarify: GET requests are basically questions that Xeoma will answer; POST requests are instructions that Xeoma will follow. For simplicity’s sake, we’ll send the commands to the same machine the browser is working on, but you can use them remotely too, as long as the relevant port is available (10090 by default).
The first such command asks Xeoma to give a list of modules currently in use on the server:
http://IP:10090/api?login=USERNAME&password=PWD&modules=
IP – the server’s IP-address (localhost for the same machine);
USERNAME – the user’s name in Xeoma (the main admin always has the name Administrator);
PWD – that user’s password.
N.B. The following symbols may NOT be used as part of either username or password: “&”, “:”.
“"” (Quotation Mark) may be used for either of them only if preceded by a backslash – “\”.
As of Xeoma version 23.12.7, the symbol “%” can be used in both usernames and passwords.
Here is what it will look like in the Postman:

Once we hit Send button, the response will be (be sure to choose JSON and Pretty in the parameters):
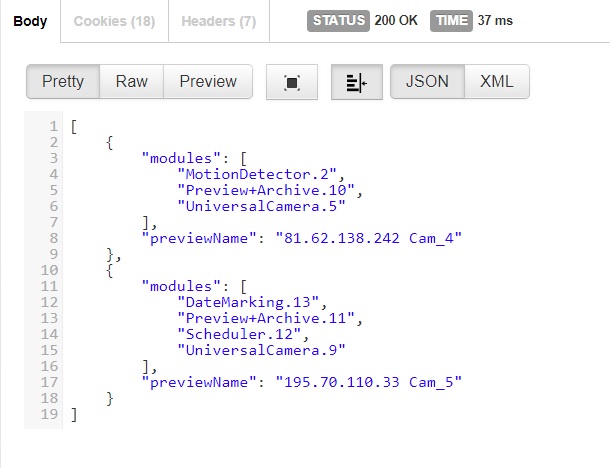
These are both our chains (each enclosed in {}), module-by-module. The name of the camera is also indicated here to identify the right camera more easily (particularly useful when several cameras have identical chains).
If you need to get a list of modules from a specific camera rather than from all cameras, you can indicate the camera’s name in that same request:
http://IP:10090/api?login=USERNAME&password=PWD&modules=&previewName=MyCam
The second command asks Xeoma about the current settings for one of the modules:
http://IP:10090/api?login=USERNAME&password=PWD&settings=MODULE_ID&get=
MODULE_ID – the unique name of the module. Remember the numbered names from Xeoma’s response to the previous command (e.g. Date.Marking.13)? That’s the ID.
The full URL will look something like this:

This time we get a more verbose response:
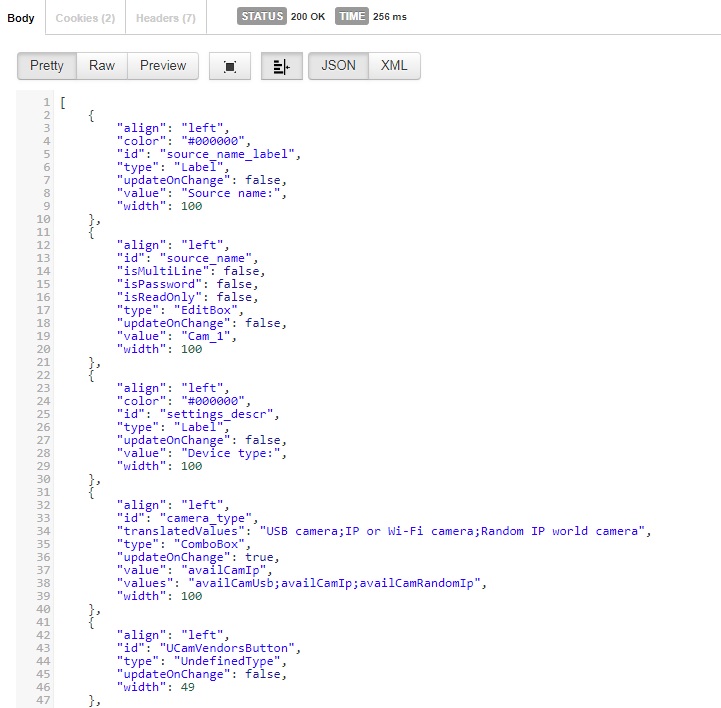
The easiest way to read this is to take a look at the type parameter. The common types are:
- Label – a text message, usually explains what the next object does. Cannot be changed.
- EditBox – a box for text the user can edit directly. Can be changed.
- ComboBox – a drop-down list or slider. Note that they often have the parameter translatedValues – these are NOT the actual parameters you can change, they are always listed separately as values. Can be changed.
- EditableComboBox – a drop-down list the user can edit. Can be changed.
- CheckBox – a box the user can tick or untick. Can be changed.
- ImageAreaSelector – a drawing board for detectors that allow the user to specify an area. Can be changed.
- ProgressBar – a bar showing percentage between 0 and 100. Cannot be changed.
- UndefinedType – a link to a web-page, does not show up in the browser (we’ll come back to that a bit later). Cannot be changed.
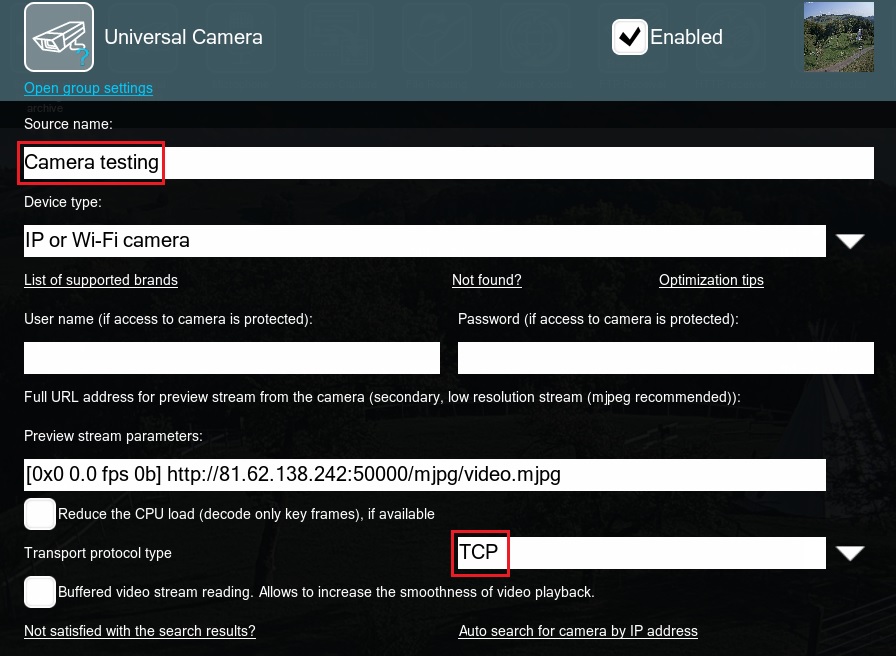
Finally, there is a command that instructs Xeoma (POST) to change the settings of a given module. This is where it gets tricky: we need both the URL and the parameters that we want to change. The command itself is:
http://IP:10090/api?login=USERNAME&password=PWD&settings=MODULE_ID&set=
The parameters and their values are:
{

“parameter1_name”:“parameter1_value”,

“parameter2_name”:“parameter2_value”,

…

}
Parameter names come from “id” values in the previous command’s response (each object has its own).
Here is an example:
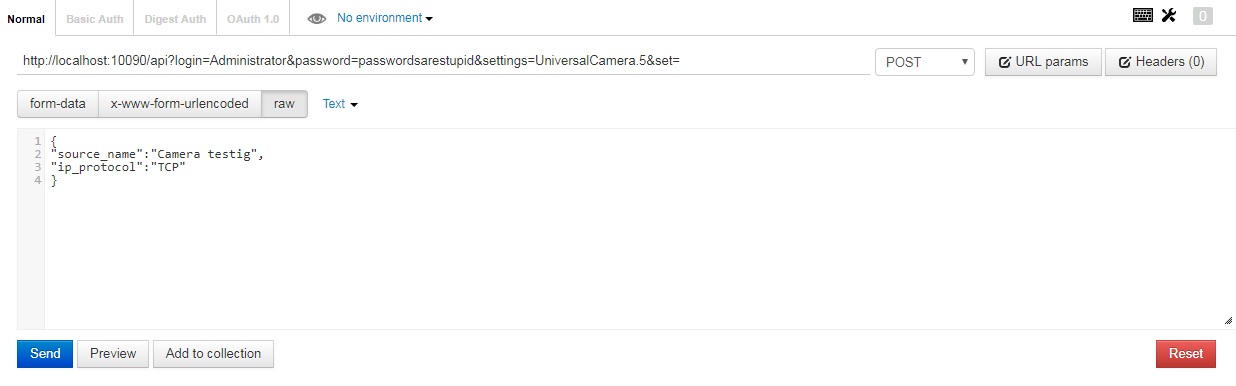
N.B. Be sure to choose POST as the command type, and raw and Text under the URL. Mind the small and capital letters, quotes, commas and colons. Every symbol counts here.
If everything is done correctly, the response will be:
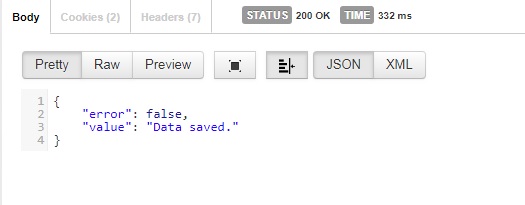
The new settings were successfully applied and saved.
Otherwise, you will see something like this:
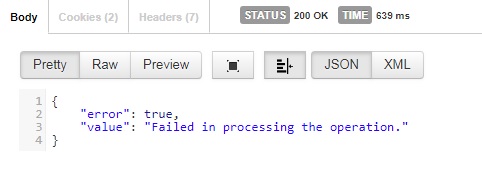
This usually indicates an error in the command syntax, check the raw text thoroughly.
Modules usually have up to 3 different states: Enabled, Disabled and Skipping. You can change any module’s state with a GET request as well:
http://IP:10090/api?login=USERNAME&password=PWD&settings=MODULE_ID&state=STATE_NAME
STATE_NAME – the state that will be assigned to the given module; available values: on, off, skip. Note that Skipping state can be applied only to Filters.
Entire new chains of modules can be added to Xeoma with a POST request:
http://IP:10090/api?login=USERNAME&password=PWD&add=
The parameters and their values are:
{

"newModule": "MODULE_NAME"

}
MODULE_NAME – similar to MODULE_ID but without a number, just the name itself (see table at the end).
If everything is done correctly, the response will be:
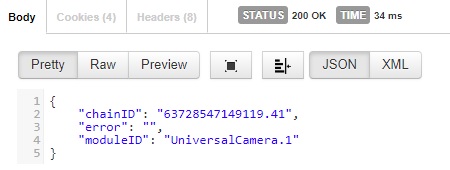
When adding a new camera you can also indicate its name:
{

"newModule" : "UniversalCamera",

"sourcename" : "MyCam1"

}
The same POST request can be used to add a module to an already existing chain, its parameters will be as follows:
{

"chainID": "CHAIN_ID",

"newModule": "NEW_MODULE_NAME",

"input": "INPUT_MODULE_NAME",

"output":["OUTPUT_MODULE_NAME_1", "OUTPUT_MODULE_NAME_2"]

}
CHAIN_ID – a unique identifier for this chain of module, can be checked with the first command in this list (asking for the list of modules).
NEW_MODULE_NAME – the name of the new module you are going to add
INPUT_MODULE_NAME – the name of the module, after which the new one is added (optional)
OUTPUT_MODULE_NAME_1 – the name of the module, before which the new one is added (optional)
OUTPUT_MODULE_NAME_2 – the name of another such module (optional)
Additionally, the same POST request can be used to add new cameras together with new users with access to those cameras. The parameters are as follows:
{

"template": "param.txt",

"users":

{

"user1": "password1",

"user2": "password2"

}

}
param.txt – the name of the file in the ChainTemplates folder of Xeoma’s main directory; the file should contain the details for the camera(s) and the chain(s) of modules, example:
chain1.UniversalCamera1.MainUrl=rtsp://192.168.0.12/channels/101

chain1.UniversalCamera1.H264ArchiveUrl=rtsp://192.168.0.12/channels/100

chain1.UniversalCamera1.PTZPort=8080

chain1.UniversalCamera1.AudioUrl=rtsp://192.168.0.12/channels/101

chain1.MotionDetector2=

chain1.Preview+Archive3=

chain1.WebconnectorTransmitter5.User=myusername

chain1.WebconnectorTransmitter5.Password=mypassword

chain1.UniversalCamera1.connected=MotionDetector2

chain1.UniversalCamera1.connected=WebconnectorTransmitter5

chain1.MotionDetector2.connected=Preview+Archive3
user1 – the name of the new user with access to the camera(s).
password1 – the password for user1
user2 – the name of another user with access to the camera(s).
password1 – the password for user2
If a user already exists, you can leave the password parameter blank.
You can also add a new user separately with this command:
http://IP:10090/api?login=USERNAME&password=PWD&adduser=
{

"login":"USERNAME",

"password": "PASSWORD"

}
The privileges of an existing user can be checked with this command:
http://IP:10090/api?login=USERNAME&password=PWD&getpermissions=
{

"login":"USERNAME"

}
The response will look like this:
{

    "chains": [

        {

            "chainID": "63786051147592.36038",

            "permissions": {

                "archive": "enabled",

                "preview": "enabled",

                "ptz": "disabled",

                "removearchive": "disabled",

                "settings": "disabled",

                "sound": "enabled"

            },

            "previewName": "Cam_1"

        },

		{

            "chainID": "63482231159940.20344",

            "permissions": {

                "archive": "enabled",

                "preview": "enabled",

                "ptz": "disabled",

                "removearchive": "disabled",

                "settings": "disabled",

                "sound": "disabled"

            },

            "previewName": "Cam_2"

        }

    ],

    "login": "testUser"

}
In order to change these privileges, another command can be used:
http://IP:10090/api?login=USERNAME&password=PWD&setpermissions=
{

        "login": "USERNAME",

        "chains": [

            {

                "chainID": "CHAIN_ID",

                "permissions": {

                    "preview": "enabled",

                    "archive": "enabled",

                    "removearchive": "enabled",

                    "ptz": "enabled",

                    "settings": "enabled",

                    "sound": "disabled"

                }

            }

        ]

}
A user can be deleted like that as well:
http://IP:10090/api?login=USERNAME&password=PWD&removeuser=
{

"login": "USERNAME"

}
Similarly, separate modules and chains of modules can be removed with a POST request:
http://IP:10090/api?login=USERNAME&password=PWD&delete=
The parameters and their values are:
{

"chainID": "CHAIN_ID"

}
or
{

"moduleID": "MODULE_ID"

}
To run a search for cameras you can use this GET request:
http://IP:10090/api?login=USERNAME&password=PWD&search=
If you need to search a specific subnet rather than the whole local network, you can indicate that subnet in the same request:
http://IP:10090/api?login=USERNAME&password=PWD&search=&addr=192.168.0.0
If you need to search for a camera with specific parameters (address, username, password, ports), you can use the following POST request:
http://IP:10090/api?login=USERNAME&password=PWD&search_by_login_and_password=
{

"login": "admin",

"password":"admin123",

"address":"192.168.0.123",

"port": 80,

"isOnlyOnvifSearch": true,

"selectDefaultLoginAndPasswords": false,

"waitResult": true

}
This process can take some time, so you can use this GET request to check its progress:
http://IP:10090/api?login=USERNAME&password=PWD&searchprogress=
To check whether the cameras on the server are currently available and whether the archives are being recorded you can use this GET request:
http://IP:10090/api?login=USERNAME&password=PWD&sourcesinfo=
You can also check the current archive statistics using this GET request:
http://IP:10090/api?login=USERNAME&password=PWD&archivestatistic=
If you need statistics for just one archive, you can indicate its name in the same request:
http://IP:10090/api?login=USERNAME&password=PWD&archivestatistic=Preview+Archive.29
You can mark certain intervals in the archive as undeletable, unmark them and request a list of such intervals, all using POST-requests:
mark:
http://IP:10090/api?login=USERNAME&password=PWD&markasundeletable=
unmark:
http://IP:10090/api?login=USERNAME&password=PWD&unmarkasundeletable=
list of intervals:
http://IP:10090/api?login=USERNAME&password=PWD&undeletableintervals=
The body for all 3 of these requests looks the same:
{

"archiveid" : "Preview+Archive.18",

"start" : "2020-01-21 12:00:00",

"end" : "2020-01-21 13:14:10"

}
Note that for requesting a list of intervals “start” and “end” parameters are optional – you can skip them to get a full list of undeletable intervals for that archive.
Object Recognition module allows for object-based searches in the archive (e.g. all intervals with people or trucks). A search like this can be performed with a POST request as well:
http://IP:10090/api?login=USERNAME&password=PWD&archivesearch=
The body for it is:
{

"archiveid": "Preview+Archive.12",

"begin": "2022-02-12 09:40:40",

"end" : "2022-02-12 18:40:00",

"objects_ids": [1,3]

}
Here “object_ids” parameter needs a list of types of objects to look for. The possible values are:
- 1 – people
- 2 – bicycles
- 3 – cars
- 4 – motorcycles
- 5 – planes
- 6 – buses
- 7 – trains
- 8 – trucks
- 9 – boats
- 10 – birds
- 11 – animals
- 12 – sports balls
- 13 – drones
- 14 – sea birds
The example above searches for people (1) and cars (3).
The response will contain a set of intervals where the required object types have been found:
{

    "intervals": {

        "2022-02-12 09:40:45": "2022-02-12 09:41:38",

		"2022-02-12 10:55:34": "2022-02-12 11:10:13",

		"2022-02-12 17:00:05": "2022-02-12 17:01:58"

    }

}
Parts of the archive can be exported and sent over FTP with a single POST request as well:
http://IP:10090/api?login=USERNAME&password=PWD&archiveftpexport=
The body for it is:
{

"archiveid": "Preview+Archive.12",

"intervals": {"2022-02-12 10:55:34":"2022-02-12 11:10:13"},

"ftp_server_address": "my.ftp.test",

"port": 21,

"login": "ftpadmin",

"password": "mysecurepassword"

}
The response will contain the overall result of the exporting (whether the process completed successfully or not) and the exported video file’s name (the file is stored in “temp” folder within Xeoma’s main directory):
{

    "error": false,

    "exported_file_name": "2022-02-22T14-38-09.avi",

    "value": "Ok"

}
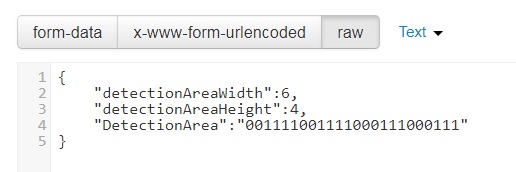
Controlling most objects is pretty self-explanatory (e.g. CheckBoxes can be true or false, EditBoxes allow any kind of text (single-line or multi-line), etc.) but ImageAreaSelectors require special attention. To “draw” an area using JSON, you will need to use 1 and 0, where zeros are pixels that are not inside the detection area, and ones are pixels inside that area. First, we need to establish the scale for the drawing in pixels via detectionAreaWidth and detectionAreaHeight (similar to e.g. canvas size in Photoshop). Suppose we want it to be a rectangle 6×4:
"detectionAreaWidth":6

"detectionAreaHeight":4
An empty area, without any detection zone at all, will look like this then:
000000

000000

000000

000000
Now we add ones to draw an area we want:
001111

001111

000111

000111
Deleting all indentations will give us this command:
Here is our brand new detection zone:

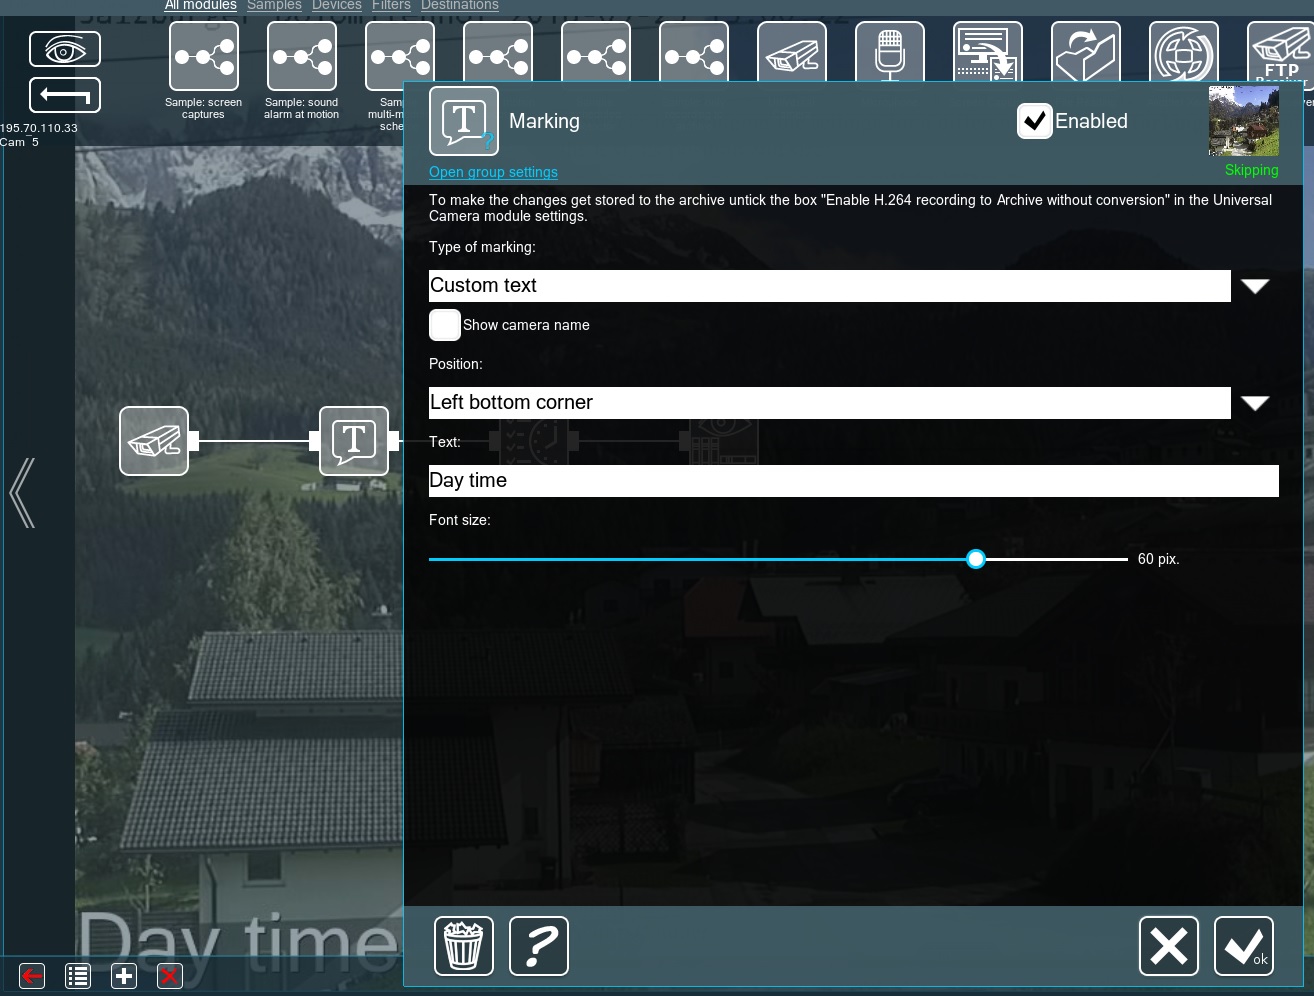
Now let’s try changing the settings for a different module – Marking. We want to alter the text, its position and size:

All done:
As we’ve mentioned before, JSON is most commonly used for web-based integration, making it ideal for working with web-pages. One last command Xeoma now understands allows to generate a full web-page with the given module’s settings:
http://IP:10090/api?login=USERNAME&password=PWD&settings=MODULE_ID
This is where we go back to the UndefinedType – objects with this type are not displayed on the resulting page, but are necessary to keep all other objects properly aligned:
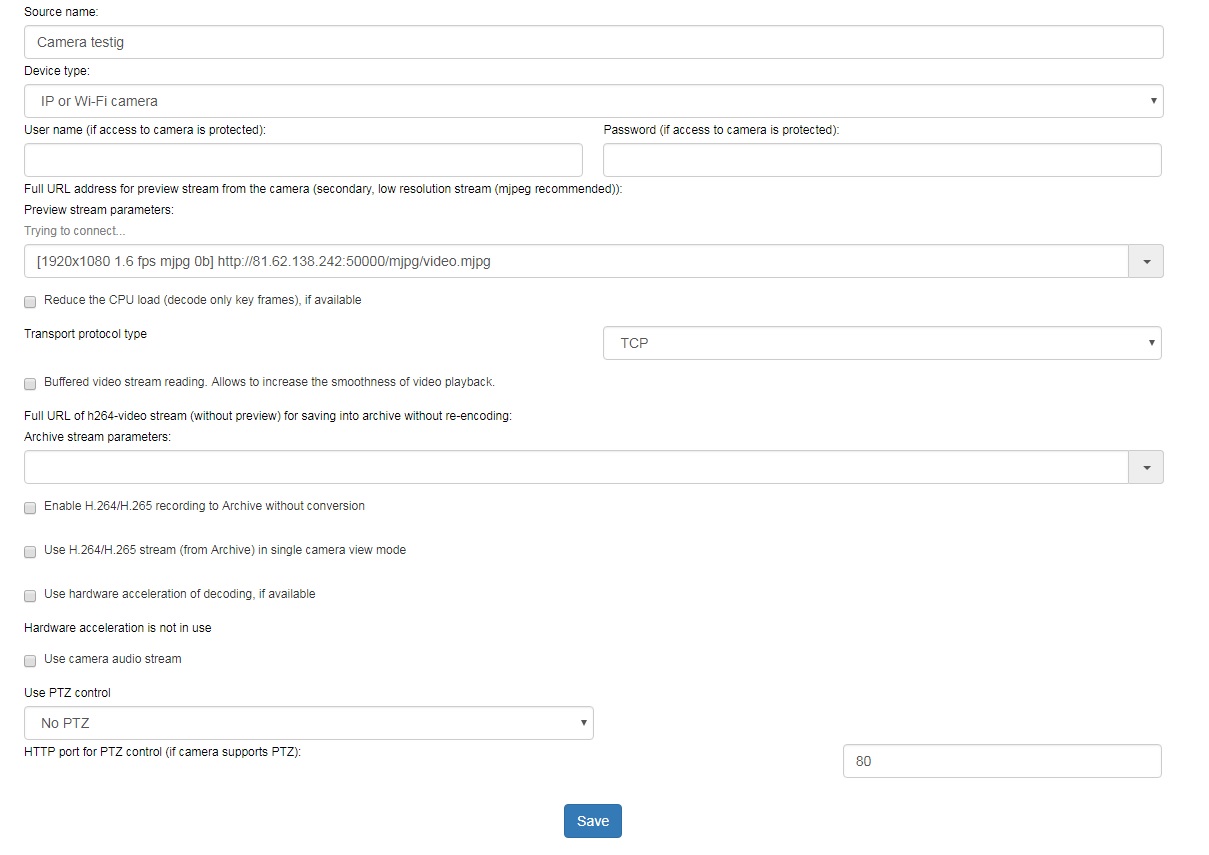
This works for every module, all changes will be applied to the server, once the Save button at the bottom is pressed.
If you are a web-developer, you probably already know what’s coming. Yes, since every part of this page (labels, boxes, etc.) is its own object, they can be taken from it, rearranged and placed on your own web-page to suit your needs or the needs of your clients.
If you need to list the names of all the available archives, this command will do exactly that:
http://IP:10090/api?login=USERNAME&password=PWD&archive_list=
Each archive also holds the list of days of recordings in it – this command allows you to have look at that list:
http://IP:10090/api?login=USERNAME&password=PWD&archive=ARCHIVE-NAME&archive_date_list=
Accordingly, each date holds the list of minutes for its recordings – another command shows this list:
http://IP:10090/api?login=USERNAME&password=PWD&archive=ARCHIVE-NAME&archive_date=yyyy-mm-dd&archive_minutes=
Knowing the name of the archive, the right date and time, we can also request an rtsp-stream of a particular archive fragment:
http://IP:10090/api?login=USERNAME&password=PWD&archive=ARCHIVE-NAME&archive_date=yyyy-mm-dd&archive_minute=HH%3aMM%3aSS&archive_millis=NUMBER&start_rtsp_archive=
Here NUMBER is the number of milliseconds starting from the beginning of that second (useful for getting the exact part of a second of the archive).
This command can also be modified like this:
http://IP:10090/api?login=USERNAME&password=PWD&archive=ARCHIVE-NAME&archive_date=yyyy-mm-dd&archive_minute=HH%3aMM%3aSS&archive_millis=NUMBER&start_rtsp_archive=&archive=
The difference is that in the former case the rtsp-stream begins immediately, once Xeoma receives the command. The latter begins the rtsp-stream only when someone connects to the rtsp-URL.
The response for both of them will look like this:
{

    "peer_id": "tbHB9lgxzxx9XZuZnD5j",

    "stream_url": "rtsp://localhost:8554/tbHB9lgxzxx9XZuZnD5j"

}
You can also get Xeoma’s current exact time with a command:
http://IP:10090/api?login=USERNAME&password=PWD&servertime=
“Hold on!” you might say. “Doesn’t this create a huge security hole? Surely, if a hacker decides to do their homework and study this API, then all that’s left to do is find my password – and my video surveillance server is at their mercy.”
We’ve considered this and here are several ways to secure this side of Xeoma:
- First and foremost, you can use Apache as your shield (not the Native Americans, this Apache). This article describes exactly how.
- The API uses Xeoma’s web-port (10090) to pass the commands to the server, but you can assign a completely different port to it via the Web Server module.
- If you have this port accessible from external networks, you can also set restrictions and rules on the router’s firewall to prevent any unwanted visitors from reaching the server.
Finally, as you may have noticed, the names for different modules do not always coincide with the ones you can find in the application. Here you can find a table with all the modules and their proper names for your convenience:
| Module | Name | JSON name |
|---|---|---|
| Universal Camera | UniversalCamera | |
| Microphone | AudioSource | |
| Screen Capture | ScreenCapture | |
| File Reading | FileInput | |
| Another Xeoma | WebConnectorReceiver | |
| FTP Receiver | FTPReceiver | |
| HTTP Receiver | HttpReceiver | |
 |
ANPR Speed Receiver | AnprSpeedReceiver |
| Motion Detector | MotionDetector | |
| PTZ Tracking | PtzTracking | |
| Senstar PTZ Tracking | SenstarPtz | |
| Visitors Counter | VisitorsCounter | |
| Object Detector | ObjectDetector | |
| Scheduler | Scheduler | |
| Marking | DateMarking | |
| Privacy Masking | AreaCensor | |
| Fisheye Dewarping | FisheyeUnwraper | |
| Button Switcher | ButtonSwitcher | |
| Day Detector | NightBlocker | |
| HTTP Switcher | HttpSwitcher | |
| HTTP Marking | HttpMarking | |
| Sound Detector | AudioDetector | |
| Image Rotate | ImageTurn | |
| ANPR | AutoNumberPlateRecognition | |
| Problems Detector | ProblemsDetector | |
| Version 19.4.22 or above: Face Recognition Other versions: Face Detector |
Version 19.4.22 or above: FaceRecognition Other versions: FaceDetector |
|
| Unitor | ImageMerger | |
| Image Resize | ImageResize | |
| Image Crop | ImageCropping | |
| Detector of abandoned objects | AbandonedObjectsDetector | |
| Smoke Detector | SmokeDetector | |
| Cross-line Detector | CrossLineDetector | |
| Loitering Detector | LoiteringDetector | |
| Relay Switch | RelaySwitch | |
| Condition | Condition | |
| Camera-Embedded Detector | OnvifDetector | |
| Object Recognizer | ObjectRecognizer | |
| Face Detector (Emotions) | FaceParametersDetector | |
| FaceID | FaceID | |
| QR Code recognition | QRCodeScanner | |
| Smart-card reader | SmartCardReader | |
| Moving to PTZ preset | PtzMoving | |
| Smart Home – RIF+ | RifDetector | |
| Sports Tracking | SportsTracking | |
| Gender Recognizer | GenderRecognizer | |
| Color Recognition | ColorRecognition | |
| Crowd Detector | CrowdDetector | |
| GPIO module | GPIOModule | |
 |
Age Recognizer | AgeRecognizer |
| Detector of construction site safety | BuildingSafetyDetector | |
 |
My Detector | MyFilter |
 |
Object size filtering | ObjectSizeFilter |
| Sound Events Detector | SoundEventsDetector | |
| Vehicle Speed Detector | VehicleSpeedLimitDetector | |
| Modbus Controllers | ModbusController | |
| Text Recognition | TextRecognizer | |
| Slip and Fall Detector | FallDetector | |
| Parking Spots | AreasSelector | |
| Eye Tracking | EyeTracker | |
 |
360° Surround View | ImageStitching |
| Thermal Camera Data | ISAPI | |
| Bird Detector | BirdDetector | |
| Freight Unloading Counter | FreightVehicleManager | |
| Preview | Preview | |
| Preview and Archive | Preview%2BArchive | |
| Save to File | FileOutput | |
| Sending Email | ||
| SMS Sending | SmsSender | |
| Web Server | WebconnectorTransmitter | |
| RTSP Broadcasting | RtspTranslator | |
| FTP Upload | FtpOutput | |
| HTTP upload to other Xeoma | HttpOutput | |
| Sound Alarm | AlarmSound | |
| Application Runner | AppRunner | |
| HTTP Request Sender | HttpRequestSender | |
| Pop-up Window (in Client) | ClientWindowPopup | |
| ANPR Sender to FTP | AnprFtpUploader | |
 |
ANPR Speed Sender | AnprSpeedSender |
| Mobile notifications | MobileCloudNotificator | |
| Streaming to YouTube | YoutubeStreamer | |
| Telegram Bot notifications | TelegramBot | |
API Tables
Basic header:
http://IP:PORT/api?
Authorization parameters (required for all further requests):
| Parameter | Value |
|---|---|
| login | Username for admin or user |
| password | Password for admin or user |
N.B. The following symbols may NOT be used as part of either username or password: “&”, “:”.
“"” (Quotation Mark) may be used for either of them only if preceded by a backslash – “\”.
Sample: http://192.168.0.12:10090/api?login=Administrator&password=123
GET-requests:
modules
Request list of modules grouped by chains; modules within a chain are ordered alphabetically
Values
–
Sample
Request:
login=Administrator&password=123&modules=
Response:
[

    {

        "chainID": "63747513361689.10202",

        "modules": [

            "MotionDetector.16",

            "Preview+Archive.17",

            "Scheduler.15",

            "UniversalCamera.12"

        ],

        "previewName": "192.168.0.214 Cam_1"

    },

    {

        "chainID": "63747513364690.28297",

        "modules": [

            "AutoNumberPlateRecognition.72",

            "HttpRequestSender.73",

            "Preview+Archive.23",

            "UniversalCamera.18",

            "WebconnectorTransmitter.74"

        ],

        "previewName": "192.168.0.250 Cam_2"

    },

    {

        "chainID": "63747513366702.1763",

        "modules": [

            "DateMarking.76",

            "Email.26",

            "MobileCloudNotificator.75",

            "MotionDetector.28",

            "ObjectRecognizer.77",

            "Preview+Archive.29",

            "UniversalCamera.24"

        ],

        "previewName": "192.168.0.77 Cam_3"

    }

]
previewName
Optional after “modules” parameter. Show only modules for cameras with “cam_name” in their name
Values
cam_name
Sample
Request:
login=Administrator&password=123&modules=&previewName=Cam_2
Response:
[

    {

        "chainID": "63747513364690.28297",

        "modules": [

            "AutoNumberPlateRecognition.72",

            "HttpRequestSender.73",

            "Preview+Archive.23",

            "UniversalCamera.18",

            "WebconnectorTransmitter.74"

        ],

        "previewName": "192.168.0.250 Cam_2"

    }

]
settings
Request HTML-page with settings for module specified by “module_id”
Values
module_id
get
Optional after “settings” parameter. Request list of all parameters of specified module and their values
Values
–
Sample
Request:
login=Administrator&password=123&settings=HttpRequestSender.73&get=
Response: see here
state
Optional after “settings” parameter. Change state of module to given value
Values
on
off
skip
Sample
Request:
login=Administrator&password=123&settings=HttpRequestSender.73&state=off
Response:
{

    "error": false,

    "value": ""

}
search
Launch simple search for local cameras; cameras will be added once the search ends
Values
–
Sample
Request:
login=Administrator&password=123&search=
Response:
{

    "error": false,

    "value": "Search for cameras is in progress..."

}
addr
Optional after “search” parameter. Search only specified subnet
Values
subnet_address
Sample
Request:
login=Administrator&password=123&search=&addr=192.168.3.0
Response:
{

    "error": false,

    "value": "Search for cameras is in progress..."

}
searchprogress
Request current search status
Values
–
Sample
Request:
login=Administrator&password=123&searchprogress=
Response:
{

    "error": false,

    "value": "Search for cameras is in progress... 23%"

}
sourcesinfo
Request list of camera states
Values
–
Sample
Request:
login=Administrator&password=123&sourcesinfo=
Response:
[

    {

        "Preview+Archive.17": "true",

        "UniversalCamera.12": {

            "ArchiveStream": "true",

            "AudioStream": "true",

            "PreviewStream": "true"

        },

        "previewName": "192.168.0.214 Cam_1"

    },

    {

        "Preview+Archive.23": "false",

        "UniversalCamera.18": {

            "ArchiveStream": "false",

            "AudioStream": "true",

            "PreviewStream": "true"

        },

        "previewName": "192.168.0.250 Cam_2"

    },

    {

        "Preview+Archive.29": "true",

        "UniversalCamera.24": {

            "ArchiveStream": "true",

            "AudioStream": "false",

            "PreviewStream": "true"

        },

        "previewName": "192.168.0.77 Cam_3"

    },

]
archivestatistic
Request statistics data for specified archive or all archives if no id is specified
Values
Optional
archive_id
Sample
Request:
login=Administrator&password=123&archivestatistic=
Response:
[

{

"all_archive_size":"224679254",

"archive_name":"Preview+Archive.17",

"archive_size":"1284371",

"available_free_space":"826504261632",

"average_size_day":"1284371",

"day_total":"1",

"size_in_seconds":"7"

},

{

"all_archive_size":"224679254",

"archive_name":"Preview+Archive.23",

"archive_size":"0",

"available_free_space":"826504261632",

"average_size_day":"0",

"day_total":"0",

"size_in_seconds":"0"

},

{

"all_archive_size":"224679254",

"archive_name":"Preview+Archive.29",

"archive_size":"223394883",

"available_free_space":"826504261632",

"average_size_day":"111697441",

"day_total":"2",

"size_in_seconds":"1721"

}

]
archive_list
Request names of all available archives
Values
–
Sample
Request:
login=Administrator&password=123&archive_list=
Response:
Main_hall

Preview+Archive.1

Preview+Archive.8
archive_date_list
Request all dates available for the specified archive
Values
archive=Archive_Name
Sample
Request:
login=Administrator&password=123&archive=Preview%2bArchive.1&archive_date_list=
Response:
2022-05-31

2022-06-01

2022-06-02

2022-06-03
archive_minutes
Request all minutes available for the specified date of the specified archive
Values
archive=Archive_Name
archive_date=yyyy-mm-dd
Sample
Request:
login=Administrator&password=123&archive=Preview%2bArchive.1&archive_date=2022-06-02&archive_minutes=
Response:
12:56:00

12:57:00

12:58:00

12:59:00

13:00:00

13:01:00

13:02:00

13:03:00

13:04:00

13:05:00

13:06:00

13:07:00

13:08:00

13:09:00

13:10:00
start_rtsp_archive
Request RTSP-URL to start a stream from the specified archive for the specified date and time immediately
Values
archive=Archive_Name
archive_date=yyyy-mm-dd
archive_minute=hh:mm:ss
archive_millis=Milliseconds
Sample
Request:
login=Administrator&password=123&archive=Preview%2bArchive.1&archive_date=2022-06-02&archive_minute=13%3a08%3a00&archive_millis=122&start_rtsp_archive=
Response:
{

    "peer_id": "tbHB9lgxzxx9XZuZnD5j",

    "stream_url": "rtsp://localhost:8554/tbHB9lgxzxx9XZuZnD5j"

}
start_rtsp_archive&archive=
Request RTSP-URL to start a stream from the specified archive for the specified date and time, once the connection is made over RTSP
Values
archive=Archive_Name
archive_date=yyyy-mm-dd
archive_minute=hh:mm:ss
archive_millis=Milliseconds
Sample
Request:
login=Administrator&password=123&archive=Preview%2bArchive.1&archive_date=2022-06-02&archive_minute=13%3a08%3a00&archive_millis=122&start_rtsp_archive&archive=
Response:
{

    "peer_id": "tbHB9lgxzxx9XZuZnD5j",

    "stream_url": "rtsp://localhost:8554/tbHB9lgxzxx9XZuZnD5j"

}
servertime
Request server’s current time
Values
–
Sample
Request:
login=Administrator&password=123&servertime=
Response:
{

    "error": false,

    "value": "2022-06-03T15:05:18Z"

}
POST-requests:
settings=module_id&set=
Change existing parameters of specified module
Body
{

"parameter_id": "parameter_value",

"parameter_id": "parameter_value"

}
Sample
Request:
login=Administrator&password=123&settings=AutoNumberPlateRecognition.72&set=
{

"UseHighQualityStreamCheckBoxId":"true",

"anpr_country_eu_openalpr":"true",

"TRIGGER_TYPE_LIST":"anpr_trigger_type_any_number"

}
Response:
{

    "error": false,

    "value": "Data saved."

}
add
Create new chain OR add new module to existing chain OR add cameras and users via template (requires .txt file in ChainTemplates directory)
Body
{

"newModule" : "module_id"

}
Optional:
“sourcename” :”camera_name”
“chainID”:”chain_id”
“input”:”module_id”
“output”:”module_id”
“template”: “cams.txt”,
“users”:
{
“user1”: “password1”,
“user2”: “password2”
}
Sample
Request:
login=Administrator&password=123&add=
New chain:
Request body:
{

"newModule":"UniversalCamera",

"sourcename":"Warehouse"

}
Response:
{

    "chainID": "63748137433608.41",

    "error": false,

    "moduleID": "UniversalCamera.3",

    "value": ""

}
New module:
Request body:
{

"chainID": "63747513361689.10202",

"newModule":"ObjectSizeFilter",

"input":"MotionDetector.16",

"output":"Preview+Archive.17"

}
Response:
{

    "error": false,

    "moduleID": "ObjectSizeFilter.4",

    "value": ""

}
By template (see sample here):
Request body:
{

"template": "mychains.txt",

"users":

{

"operator1": "securepassword",

"StephenK": "hiddenpassword"

}

}
Response:
{

    "error": false,

    "value": ""

}
delete
Delete specified chain or module
Body
"chainID": "chain_id"
OR
"moduleID": "module_id"
Sample
Request:
login=Administrator&password=123&delete=
{

"chainID":"63748139291414.41"

}
Response:
{

    "error": false,

    "value": ""

}
markasundeletable
Mark specified interval of specified archive as undeletable
Body
{

"archiveid":"archvie_id",

"begin":"yyyy-mm-dd hh:mm:ss",

"end":"yyyy-mm-dd hh:mm:ss"

}
Sample
Request:
login=Administrator&password=123&markasundeletable=
{

"archiveid":"Preview+Archive.29",

"begin":"2021-02-03 09:29:00",

"end":"2021-02-03 09:37:00"

}
Response:
{

    "error": false,

    "value": ""

}
unmarkasundeletable
Unmark specified interval of specified archive as undeletable
Body
{

"archiveid":"archvie_id",

"begin":"yyyy-mm-dd hh:mm:ss",

"end":"yyyy-mm-dd hh:mm:ss"

}
Sample
Request:
login=Administrator&password=123&unmarkasundeletable=
{

"archiveid":"Preview+Archive.29",

"begin":"2021-02-03 09:29:00",

"end":"2021-02-03 09:37:00"

}
Response:
{

    "error": false,

    "value": ""

}
undeletableintervals
Request list of undeletable intervals of specified archive; parameters “begin” and “end” are optional in this case
Body
{

"archiveid":"archvie_id",

"begin":"yyyy-mm-dd hh:mm:ss",

"end":"yyyy-mm-dd hh:mm:ss"

}
Sample
Request:
login=Administrator&password=123&undeletableintervals=
{

"archiveid":"Preview+Archive.29"

}
Response:
{

    "intervals": [

        {

            "begin": "2021-02-03 09:29:00",

            "end": "2021-02-03 09:37:00"

        }

    ]

}
archivesearch
Searches the given archive’s metadata for invertvals with given object types and responds with timecodes for them. Possible object IDs:
1 – people
2 – bicycles
3 – cars
4 – motorcycles
5 – planes
6 – buses
7 – trains
8 – trucks
9 – boats
10 – birds
11 – animals
12 – sports balls
13 – drones
14 – sea birds
Body
{

"archiveid": "Preview+Archive.12",

"begin": "2022-02-12 09:40:40",

"end" : "2022-02-12 18:40:00",

"objects_ids": [1,3]

}
Sample
Request:
login=Administrator&password=123&archivesearch=
{

"archiveid": "Preview+Archive.12",

"begin": "2022-02-12 09:40:40",

"end" : "2022-02-12 18:40:00",

"objects_ids": [1,3]

}
Response:
{

"intervals": {

"2022-02-12 09:40:45": "2022-02-12 09:41:38",

"2022-02-12 10:55:34": "2022-02-12 11:10:13",

"2022-02-12 17:00:05": "2022-02-12 17:01:58"

}

}
archiveftpexport
Exports the indicated intervals from the given archive (as AVI) and sends them to the indicated FTP server
Body
{

"archiveid": "Preview+Archive.12",

"intervals": {"2022-02-12 10:55:34":"2022-02-12 11:10:13"},

"ftp_server_address": "my.ftp.test",

"port": 21,

"login": "ftpadmin",

"password": "321"

}
Sample
Request:
login=Administrator&password=123&archiveftpexport=
{

"archiveid": "Preview+Archive.12",

"intervals": {"2022-02-12 10:55:34":"2022-02-12 11:10:13"},

"ftp_server_address": "my.ftp.test",

"port": 21,

"login": "ftpadmin",

"password": "321"

}
Response:
{

"error": false,

"exported_file_name": "2022-02-22T14-38-09.avi",

"value": "Ok"

}
adduser
Adds a new user with the specified name and password
Body
{

	"login": "USERNAME",

	"password": "PASSWORD"

}
Sample
Request:
login=Administrator&password=123&adduser=
{

	"login": "TestUser",

	"password": "strongpass"

}
Response:
{

"error": false,

"value": ""

}
removeuser
Removes the specified user
Body
{

	"login": "USERNAME"

}
Sample
Request:
login=Administrator&password=123&removeuser=
{

	"login": "TestUser"

}
Response:
{

"error": false,

"value": ""

}
getpermissions
Shows the current privileges for the specified user
Body
{

	"login": "USERNAME"

}
Sample
Request:
login=Administrator&password=123&getpermissions=
{

	"login": "TestUser"

}
Response:
{

    "chains": [

        {

            "chainID": "63789868655529.46105",

            "permissions": {

                "archive": "enabled",

                "preview": "enabled",

                "ptz": "enabled",

                "removearchive": "enabled",

                "settings": "enabled",

                "sound": "enabled"

            },

            "previewName": "Cam_1 "

        },

        {

            "chainID": "63789868657978.47643",

            "permissions": {

                "archive": "enabled",

                "preview": "enabled",

                "ptz": "enabled",

                "removearchive": "enabled",

                "settings": "enabled",

                "sound": "enabled"

            },

            "previewName": "Cam_2 "

        }

    ],

    "login": "TestUser"

}
setpermissions
Changes the privileges for the specified user
Body
{

	"login": "USERNAME",

	"chains": [

		{

			"chainID": "CHAIN_ID",

			"permissions": {

				"preview": "enabled",

				"archive": "disabled",

				"removearchive": "disabled",

				"ptz": "enabled",

				"settings": "disabled",

				"sound": "enabled"

			}

		}

	]

}
Sample
Request:
login=Administrator&password=123&setpermissions=
{

"login": "TestUser",

	"chains": [

		{

			"chainID": "63789868655529.46105",

			"permissions": {

				"preview": "enabled",

				"archive": "enabled",

				"removearchive": "disabled",

				"ptz": "disabled",

				"settings": "disabled",

				"sound": "enabled"

			}

		},

		{

            "chainID": "63789868657978.47643",

            "permissions": {

                "archive": "enabled",

                "preview": "enabled",

                "ptz": "enabled",

                "removearchive": "enabled",

                "settings": "disabled",

                "sound": "enabled"

            }

		}

	]

}

}
Response:
{

"error": false,

"value": ""

}
search_by_login_and_password
Begins the search for cameras using the specified parameters
Body
{

"login": "admin",

"password":"admin123",

"address":"192.168.0.123",

"port": 80,

"isOnlyOnvifSearch": true,

"selectDefaultLoginAndPasswords": false,

"waitResult": true

}
Sample
Request:
login=Administrator&password=123&search_by_login_and_password=
{

"login": "admin",

"password":"admin123",

"address":"192.168.0.123",

"port": 80,

"isOnlyOnvifSearch": true,

"selectDefaultLoginAndPasswords": false,

"waitResult": true

}
Response:
{

    "result": {

        "cams": [

            {

                "allArchiveRtspStreams": [

                    "rtsp://admin:admin123@192.168.0.123/Streaming/Channels/101?transportmode=unicast&profile=Profile_1",

                    "rtsp://admin:admin123@192.168.0.123/Streaming/Channels/102?transportmode=unicast&profile=Profile_2",

                    "rtsp://admin:admin123@192.168.0.123/Streaming/Channels/101?transportmode=mcast&profile=Profile_1",

                    "rtsp://admin:admin123@192.168.0.123/Streaming/Channels/102?transportmode=mcast&profile=Profile_2"

                ],

                "allPreviewStreams": [

                    "rtsp://admin:admin123@192.168.0.123/Streaming/Channels/101?transportmode=unicast&profile=Profile_1",

                    "rtsp://admin:admin123@192.168.0.123/Streaming/Channels/102?transportmode=unicast&profile=Profile_2",

                    "rtsp://admin:admin123@192.168.0.123/Streaming/Channels/101?transportmode=mcast&profile=Profile_1",

                    "rtsp://admin:admin123@192.168.0.123/Streaming/Channels/102?transportmode=mcast&profile=Profile_2"

                ],

                "ip": "192.168.0.123"

            }

        ],

        "done": true,

        "progress": 1

    },

    "sourceInfo": {

        "chainID": "63795725721941.62915",

        "modules": [

            "Email.4",

            "MotionDetector.6",

            "Preview+Archive.7",

            "ProblemsDetector.3",

            "Scheduler.5",

            "SmsSender.9",

            "UniversalCamera.2",

            "WebconnectorTransmitter.8"

        ],

        "previewName": "192.168.0.123 Cam_8"

    }

}
Common parameters of various modules, can be used for “set” commands:
| Parameter | Description | Sample |
|---|---|---|
| id | Unique identifier for parameter; required to make “set” command; “id” for “Preview and Archive” is spelled differently for request headers and bodies: header: Preview%2BArchive body: Preview+Archive |
"id": "MinDiskSpace" |
| type | Type of parameter or control associated with it | "type": "CheckBox" |
| value | Current value of parameter | "value": "{1 }videodetectorbase_sec" |
| values | All available values for parameter; applies to type “ComboBox” | "values": "previewarchive_no_fps_limit;{30 }previewarchive_fps;{20 }previewarchive_fps;{10 }previewarchive_fps;{5 }previewarchive_fps;{2 }previewarchive_fps;{1 }previewarchive_fps;{2 }previewarchive_sec;{5 }previewarchive_sec;{10 }previewarchive_sec;{20 }previewarchive_sec;{30 }previewarchive_sec;{1 }previewarchive_minute;{2 }previewarchive_minutes;{5 }previewarchive_minutes;{10 }previewarchive_minutes;{30 }previewarchive_minutes;{1 }previewarchive_hour;{1 }previewarchive_day" |
| translatedValues | Values, the way they are represented in the app; correspond to “values”, used for reference | "translatedValues": "maximum fps;30 fps;20 fps;10 fps;5 fps;2 fps;1 fps;2 sec;5 sec;10 sec;20 sec;30 sec;1 minute;2 minutes;5 minutes;10 minutes;30 minutes;1 hour;1 day" |
October, 5 2018
Read also:
API for integration of Xeoma
Integration example: Xeoma and Telegram