Xeoma OEM: Web Interface Customization
Xeoma video surveillance software offers free rebranding opportunities for partners and users. Following a simple process of Xeoma customization you will get a unique version of Xeoma, just to your taste. The customization tool is free of charge.
Note: you can also request paid customization if you don’t want to get into that yourself.
By means of our OEM utility you can change both the interface of the application as well as its web interface in case you or your clients are going to be viewing cameras through a web browser instead of the app or software. With the free web interface customization and rebranding you will be able to change icons, color scheme, logo, and also the name of the program in Xeoma’s Web page.
Web interface customization – 9 easy steps:
1) Download the latest version of our free OEM utility from our website. Please do not use previously edited customization files.
2) Download the Xeoma version that you’d like to customize web interface for. If you need older versions of Xeoma, please check this page
*Note that you can run the customization tool on a Windows machine only, but Xeoma for any supported operating system can be rebranded with it.
3) Copy Xeoma’s executable files (xeoma.exe, xeoma.app, xeoma.dmg etc.) to the corresponding subfolder distrib folder.
*Note that you should be using a “clean” version of Xeoma every time you do the customization. We do not recommend doing follow-up customization improvement on top of a previous attempt.
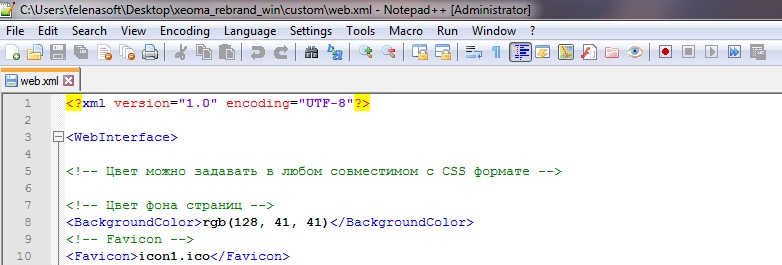
4) Go to custom folder and open web.xml file (you can use different programs to open .xml files e.g. NotePad++).
Here you can change the logo, colors, text, etc. Save all the changes.
5) Copy necessary resources (icons, logo) into custom folder.
6) Run customize.bat. The customization process will start and open a console window where you can see the progress. You can also view basic output in the .log file next to the customizer.

|
Attention! Before running customize.bat, make sure that Xeoma or its rebranded versions are stopped and are not running at the machine where you’re doing the customization. Pay special attention if your Xeoma is installed into autostart: in that case, it restarts when you try to kill it. Stop the service with the -stopservice command before you do the customization on such a machine. |
7) Take the modified files from the distrib folder
8) Launch the customized Xeoma version on the appropriate operating system and add cameras. Add the ‘Web Server’ module in the modules chain of each or some of cameras.
9) Copy URL from ‘Web Server’ module’s settings and insert it into your browser’s address bar and hit Enter, Go, or arrow. (if accessing from a remote device, replace the “localhost” address with the Server’s IP address of the machine where Xeoma is installed).
A web interface will be opened where you will be able to see the changes you have applied.
What exactly we can change with customization utility:
Program name
e.g.: <ProductName>Your Program Name</ProductName>


Favicon
e.g.: <Favicon>icon.ico</Favicon>


Logo
e.g.: <LogoImage>logo1.png</LogoImage>
![]()
![]()
Interface color scheme
*You can set the color in any CSS-compatible format. You can use online applications for defining the color number.
e.g.: <BackgroundColor>rgb(128, 41, 41)</BackgroundColor>


|
|
Attention! If nothing changes with the browser page opening, check if the following advice help: |
October, 9 2020
Read also:
Free customization/rebranding – general information about the OEM utility
Advanced paid rebranding/customization (customization outsourcing, copyright removal)
How to request paid development of features in Xeoma
Remote connection and view through the web interface